
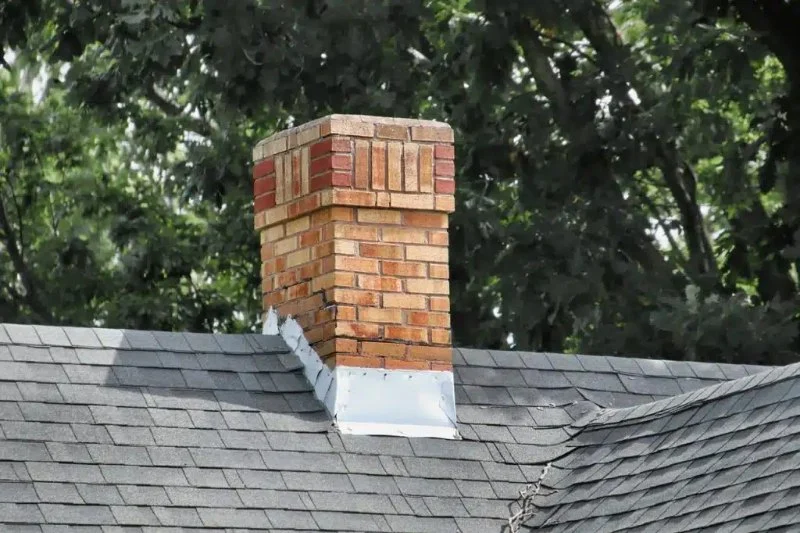
Roofing Around Chimneys: Proper Flashing & Cap Installation
- 1-Why Flashing is Essential Around Chimneys
- 2-Importance of Chimney Cap Installation
- 3-Common Issues from Poor Flashing
- 4-Steps to Install Proper Flashing and Cap
- 5-Maintenance Tips for Flashing and Chimney Caps
- 6-Choosing Professional Roofing Services for Flashing & Cap Installation
1. Why Flashing is Essential Around Chimneys
Flashing around chimneys is one of the most important components of a roofing system. This metal barrier is designed to prevent water from seeping into the gaps between the chimney and the roof. Without proper flashing, rainwater can infiltrate your roof and cause significant damage to the structure of your home, leading to costly repairs.
In colder climates like Canada, where snow and rain are frequent, improper flashing can cause leaks, wood rot, and even mold growth. Proper flashing ensures that water is diverted away from the chimney, maintaining the integrity of your roof and the overall health of your home.
Stokes Roofing / stokes roofing
PeterboroughPeterborough CountyOntario
641 Bellaire St, Peterborough, ON K9J 3Y5, Canada
2. Importance of Chimney Cap Installation
Chimney caps serve as a protective barrier for your chimney. They prevent debris, animals, and rain from entering the chimney, which can cause blockages, rust, and other damage. Additionally, a chimney cap helps to prevent downdrafts, which occur when cold air or smoke enters your home through the chimney.
A properly installed chimney cap can help extend the lifespan of your chimney and prevent costly repairs. It also improves the energy efficiency of your home by reducing heat loss through the chimney. Installing a chimney cap is an essential step in protecting both your roof and your home from water damage and other issues.
Marlad Roofing & Siding Inc / marlad
BramptonRegional Municipality of PeelOntario
30 Hale Rd Unit 14, Brampton, ON L6W 4N9, Canada
3. Common Issues from Poor Flashing
When flashing is not installed properly or deteriorates over time, several issues can arise:
- Water Leaks: Poorly installed flashing can allow water to seep into the roof, leading to leaks in your home.
- Ice Dams: In colder regions, improper flashing can contribute to the formation of ice dams, which can cause significant damage to both the roof and the interior of the home.
- Structural Damage: If water is allowed to seep into the roof, it can lead to wood rot, mold growth, and even damage to the attic and ceilings.
These issues highlight the importance of ensuring proper flashing installation around chimneys to prevent costly repairs and maintain the health of your roof.
4. Steps to Install Proper Flashing and Cap
Installing flashing and a chimney cap requires precision and care. Here are the essential steps for ensuring proper installation:
- Step 1: Inspect the Chimney Area: Before installing flashing or a cap, inspect the chimney area for damage or signs of wear. Ensure that the chimney is clean and free of debris.
- Step 2: Install the Flashing: Start by placing the flashing around the base of the chimney, ensuring that it fits tightly against the roof. Flashing should be properly sealed to prevent water infiltration.
- Step 3: Secure the Chimney Cap: After installing the flashing, secure the chimney cap on top of the chimney to keep debris, animals, and moisture out. Make sure the cap fits snugly and is secure.
If you're not experienced with roofing work, it's recommended to hire a professional roofer to ensure that flashing and caps are installed correctly.
5. Maintenance Tips for Flashing and Chimney Caps
Proper maintenance of flashing and chimney caps is essential to keep your roof in top condition. Here are some tips:
- Check for Gaps: Regularly inspect the flashing for gaps or cracks. Over time, the flashing can become loose, and gaps may form, allowing water to enter the roof.
- Clean the Chimney Cap: Clean the chimney cap to remove debris, leaves, and twigs that may block airflow. A blocked cap can lead to dangerous issues like carbon monoxide buildup.
- Inspect for Rust: Check the flashing and cap for signs of rust. If you notice rust, it may be time to replace or re-seal these components to prevent leaks.
Routine inspections and maintenance can prevent damage, saving you money on future repairs and protecting the longevity of your roof and chimney.
6. Choosing Professional Roofing Services for Flashing & Cap Installation
While DIY installation is possible, installing proper flashing and chimney caps is a complex task that requires expertise. If you're not confident in your abilities or if you're unsure about the condition of your roof, it's best to hire a professional roofing company.
Pickering Roofing offers expert flashing and chimney cap installation services to ensure your roof remains protected from water damage, leaks, and other issues. Our experienced team can assess your roof, recommend the best solutions, and carry out installations with precision and care.
Whether you need new flashing, a chimney cap installation, or repairs to your current setup, we are here to help. Contact Pickering Roofing today to get started and ensure your roof stays in top condition for years to come.
 The Roofer's Son Inc.5.0 (1 reviews)
 Elements North Roofing & Exterior Solutions5.0 (6 reviews)
 Wolfe Exteriors Inc5.0 (6 reviews)
 Toitures Garant et Frères Inc5.0 (3 reviews)
 Nor Star Aluminum & Vinyl Products4.0 (42 reviews)
 Couvreur La Releve5.0 (1 reviews)
 How Much Does a New Roof Cost in 2025? Canadian Roofing Price Guide
 Top Signs Your Roof Has a Leak and What to Do About It in Canada
 Can You Install a New Roof Over an Old One in Canada?
 The Top Questions to Ask Before Hiring a Roofer in Canada
 What Are the Most Common Roofing Scams and How to Avoid Them in Canada
 How to Prepare Your Home for a Roofing Project in Canada