
- 1- Why Roof Penetration Seals Are Critical for Your Roof’s Integrity
- 2- Common Roof Penetrations: Vents, Pipes, and Antennas
- 3- Best Sealant Options for Roof Penetrations
- 4- How to Properly Install Roof Penetration Seals
- 5- Maintenance Tips to Ensure Longevity of Your Roof Penetration Seals
- 6- When to Seek Professional Help for Roof Penetration Repairs
1- Why Roof Penetration Seals Are Critical for Your Roof’s Integrity
Roof penetrations, such as vents, pipes, and antennas, are common features in most homes. However, these openings can create vulnerabilities in your roof if not properly sealed. Without proper sealing, water can easily seep through these penetrations, leading to leaks, mold growth, and significant structural damage over time. In this guide, we will explore the best practices for sealing roof penetrations, ensuring your home remains dry and protected from the elements.
Sealing roof penetrations properly not only prevents leaks but also helps in extending the lifespan of your roof. By using the right materials and techniques, you can avoid costly repairs down the road. Let’s dive into the key practices for sealing roof penetrations, specifically for vents, pipes, and antennas.
2- Common Roof Penetrations: Vents, Pipes, and Antennas
Several types of roof penetrations can create openings for water to enter your home. The most common include:
2.1. Vents
Roof vents are essential for maintaining airflow and ventilation in your attic or home. They allow hot air and moisture to escape, preventing the buildup of mold or heat damage. However, poorly sealed vents can allow water to penetrate, especially during heavy rain or snowmelt.
2.2. Pipes
Pipes that extend through the roof are often used for plumbing or venting appliances like water heaters or gas systems. If the pipes are not sealed correctly at the penetration point, water can leak inside the walls or attic, causing extensive damage.
2.3. Antennas
Antennas or satellite dishes are often mounted on roofs to provide signal reception. These penetrations must be sealed tightly to prevent water infiltration. Over time, the seals around the antenna base can degrade, leading to leaks.
3- Best Sealant Options for Roof Penetrations
Choosing the right sealant is essential for ensuring the effectiveness and durability of your roof penetration seals. Different materials work better for different types of penetrations. Let’s look at some of the best sealant options for your roof:
3.1. Silicone Sealant
Silicone sealant is one of the most popular choices for roof penetrations due to its excellent waterproofing properties. It provides a long-lasting, flexible seal that can withstand temperature fluctuations and UV rays. Silicone is ideal for use around vents and pipes, particularly in areas with frequent exposure to moisture.
3.2. Polyurethane Sealant
Polyurethane sealants are another excellent option, particularly for outdoor applications. They are highly durable and offer resistance to weathering and wear. This type of sealant works well around antennas and other fixtures exposed to harsh conditions.
3.3. Butyl Rubber Sealant
Butyl rubber sealant is often used for sealing pipe penetrations, as it offers excellent adhesion to metal and plastic surfaces. It is also highly flexible, making it a great option for areas where movement is expected, such as around plumbing pipes.
4- How to Properly Install Roof Penetration Seals
Proper installation is key to ensuring that your roof penetration seals are effective in preventing leaks. Follow these steps for each type of penetration:
4.1. Clean the Area
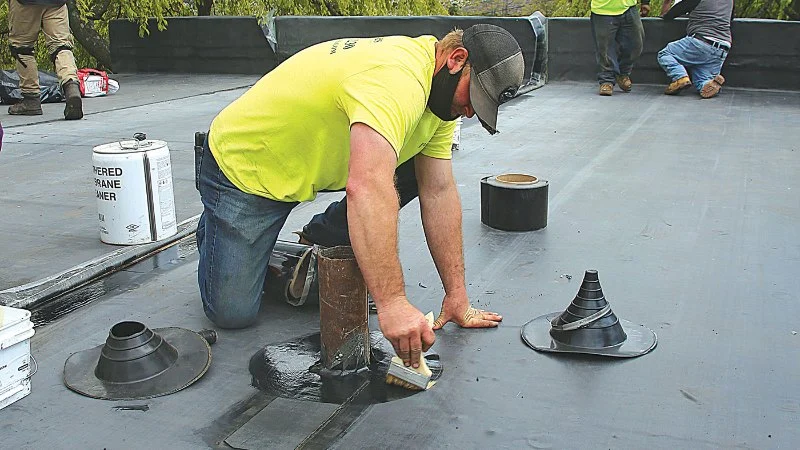
Before applying any sealant, clean the area around the penetration thoroughly. Remove dirt, debris, and any old sealant that may have deteriorated. This will allow the new sealant to adhere properly to the surface.
4.2. Apply the Sealant
Using a caulk gun, apply the chosen sealant around the base of the penetration. Be sure to apply a generous amount and smooth it out with a putty knife or your finger to ensure an even and complete seal. For larger penetrations, consider using a foam filler to fill in the gap before sealing.
4.3. Allow for Curing Time
Once the sealant is applied, allow it to cure for the recommended amount of time (usually 24 hours). During this time, avoid exposing the sealant to moisture or rain to ensure it cures properly.
5- Maintenance Tips to Ensure Longevity of Your Roof Penetration Seals
Once your roof penetrations are sealed, it’s important to maintain the seals to ensure their longevity. Here are a few maintenance tips:
5.1. Regular Inspections
Inspect your roof periodically, especially after heavy storms or snowfall, to ensure the seals remain intact. Look for any cracks or gaps that may have developed over time and reapply sealant as needed.
5.2. Clean Around the Penetrations
Keep the area around vents, pipes, and antennas clear of debris, as this can prevent the seals from functioning properly. Regular cleaning can also help prevent damage to the sealant from organic growth like moss or algae.
6- When to Seek Professional Help for Roof Penetration Repairs
While sealing roof penetrations can be a straightforward DIY project, some situations require professional assistance. If you notice significant water damage inside your home, or if the sealant is failing in multiple areas, it may be time to call a roofing expert.
Professional roofers have the expertise and tools to properly assess and repair roof penetrations, ensuring long-term durability and protecting your home from future leaks. For professional services and products related to roof penetration sealing, visit [Pickering Roofing] for expert solutions.


 SP Roofing and Renovations5.0 (1 reviews)
 Crown Architectural Sheet Metal & Cladding Ltd.5.0 (3 reviews)
 Haida Roofing & Drainage5.0 (6 reviews)
 Sunshine Roofing Ltd5.0 (2 reviews)
 Y Laramée Couvreur Inc4.0 (48 reviews)
 Rayner roofing0.0 (0 reviews)
 How Much Does a New Roof Cost in 2025? Canadian Roofing Price Guide
 Top Signs Your Roof Has a Leak and What to Do About It in Canada
 Can You Install a New Roof Over an Old One in Canada?
 The Top Questions to Ask Before Hiring a Roofer in Canada
 What Are the Most Common Roofing Scams and How to Avoid Them in Canada
 How to Prepare Your Home for a Roofing Project in Canada