
Roof Flashing Guide: Common Leak Points to Check
On this page
Quick answer
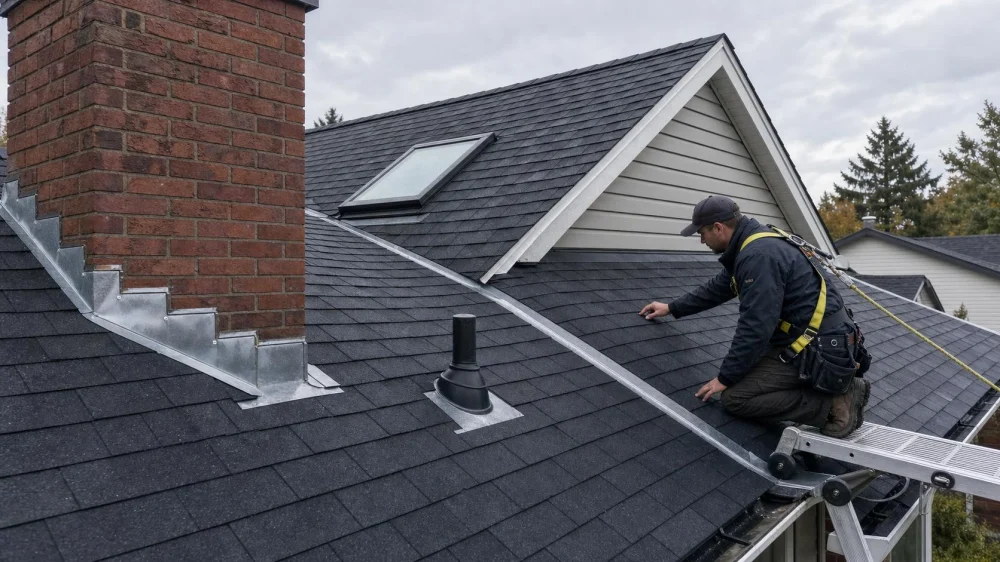
Roof flashing directs water away from joints and penetrations where roofing alone cannot provide a reliable transition. Common trouble spots include chimneys, skylights, plumbing vents, valleys, dormers, roof-to-wall joints, and drip edges. From the ground, look for displaced metal, open seams, corrosion, failed sealant, and nearby staining—but arrange a professional inspection instead of climbing onto a wet, icy, steep, or damaged roof.

Flynn Canada Ltd. - Ottawa / flynn ottawa
1655 Comstock Rd, Gloucester, ON K1B 5L2, Canada
What roof flashing is
Roof flashing is a water-shedding material installed at roof joints, changes in plane, edges, and penetrations to guide rain and meltwater over the roofing system rather than into the building.
It may be formed from metal or another approved membrane, depending on the assembly. Good flashing relies on overlap, integration with underlayment and cladding, fastening, and drainage direction—not a surface bead of sealant alone.

Flynn Canada Ltd. - Toronto / flynn mississauga
MississaugaRegional Municipality of PeelOntario
6435 Northwest Dr, Mississauga, ON L4V 1X1, Canada
Common flashing locations
- Chimneys: step flashing at the sides, apron flashing at the low side, and counterflashing tied into masonry.
- Roof-to-wall joints: step flashing woven with shingles and protected where the wall cladding meets the roof.
- Skylights: a manufacturer-specific head, sill, and side flashing system.
- Plumbing and mechanical vents: a boot or flange integrated with the surrounding roofing.
- Valleys: metal or membrane details that carry concentrated runoff where two roof planes meet.
- Dormers and changes in slope: transition details that manage water at several intersecting planes.
- Eaves and rakes: drip-edge components that guide water away from fascia and roof edges.
Warning signs of failure
- Metal that is bent, lifted, missing, split, or visibly separated.
- Corrosion holes or fasteners backing out near a joint.
- Cracked, shrunken, or repeatedly patched sealant.
- Shingles lifting beside a chimney, wall, skylight, or vent.
- Loose or cracked vent boots and collars.
- Masonry cracks or counterflashing pulling away from a chimney.
- Water stains on attic sheathing, rafters, ceilings, or walls near a transition.
- Recurring leakage during wind-driven rain, rapid snowmelt, or freeze-thaw cycles.
A stain is evidence of moisture, not proof that the visible flashing directly above it failed. Condensation, ice dams, plumbing, and another roof opening can produce similar symptoms.
A safe ground-level check
- Use binoculars or a camera zoom from several safe viewpoints.
- Compare current photos with older images when available.
- Look at chimneys, skylights, vent pipes, dormers, valleys, and wall intersections.
- Note where debris or ice may slow drainage.
- Inspect ceilings and attic areas from safe interior access after rain or thaw.
- Record weather, wind direction, leak timing, and stain location.
- Protect the interior from dripping water without touching wet electrical fixtures.
Do not walk the roof to press metal back into place. Roofing can be slippery even when it appears dry, and stepping near a weakened deck creates additional risk.
Why the stain may not be below the leak
Water can travel along underlayment, roof decking, nails, rafters, pipes, or wiring before it drips. Wind can push rain uphill at a vulnerable joint, while ice dams can back meltwater beneath shingles. A contractor may need to trace the path from both roof and attic and, when appropriate, use controlled water testing.
Good diagnosis separates the entry point from the damage path. Repairing the ceiling stain before stopping and drying the source can hide continuing deterioration.
Repair, reseal, or replace?
A limited repair may suit a correctly designed flashing detail with localized displacement and sound surrounding materials. Replacement is often more appropriate when metal is corroded, incorrectly lapped, punctured, incompatible with adjacent materials, or buried under repeated surface patches.
Sealant can be part of a specified detail, but it should not substitute for missing step flashing, correct overlap, or proper counterflashing. When to choose broader replacement: the same joint has leaked repeatedly, decking is damaged, the surrounding roof is being replaced, or the original installation cannot drain correctly.
Contractor checklist
- Which flashing component failed, and what evidence supports that diagnosis?
- Will shingles, siding, masonry, or skylight components be removed to integrate the repair?
- How will new flashing overlap underlayment and adjacent materials?
- Are the metals compatible with each other and with treated wood or masonry?
- Will wet insulation, sheathing, or interior finishes be assessed and dried or replaced?
- Does the work require a permit or inspection in this municipality?
- What workmanship and product warranties apply, and could work affect an existing roof warranty?
- How will photos document concealed work before it is covered?
Limitations and urgent situations
Flashing design varies with roof material, slope, climate exposure, manufacturer instructions, and provincial or municipal code. This overview cannot specify dimensions, fasteners, membranes, or metal type for a particular house.
Seek urgent help for active water near electrical panels or fixtures, a sagging ceiling or roof deck, loose metal that may fall, major storm openings, or possible structural damage. Keep people away from the affected area and call emergency services if immediate danger exists.
Frequently asked questions
Can roof flashing be repaired with caulk?
Sometimes sealant is specified for a small part of a sound detail, but caulk alone does not replace correct flashing overlap and integration. Repeated surface caulking can conceal the defect without fixing it.
How long should flashing last?
There is no universal service life. Metal type, coating, exposure, installation, movement, nearby materials, and maintenance all matter. Inspect transitions whenever the roof is assessed.
Should flashing be replaced with new shingles?
It should at least be exposed and evaluated. Reuse depends on condition, compatibility, manufacturer instructions, code, and whether it can be properly reintegrated. Ask the contractor to state the decision in writing.
Is a ceiling stain always a roof leak?
No. Plumbing, condensation, mechanical equipment, and ice damming can also cause stains. Timing and moisture tracing help identify the source.
Sources and evidence notes
Natural Resources Canada’s roof and attic guidance identifies flashing at valleys and chimneys, roof failures, condensation, and ice-dam leaks as moisture sources that must be distinguished. Final repair details should follow applicable code and the roofing or skylight manufacturer.
Next steps
Photograph the transition from safe locations, record when leakage occurs, and protect the interior. Request an inspection that traces the water path and explains how the proposed flashing will integrate with roofing, walls, underlayment, and drainage—then compare scopes, not just prices.


 Christensen & McLean Roofing3.0 (13 reviews)
 Perfect Choice Roofing & Eavestrough5.0 (66 reviews)
 Building Products Okanagan0.0 (0 reviews)
 M & D General Contracting Ltd5.0 (6 reviews)
 Green Roofing Solutions5.0 (12 reviews)
 Next Roofing Solution Ltd.5.0 (1 reviews)
 How Much Does a New Roof Cost in 2025? Canadian Roofing Price Guide
 Top Signs Your Roof Has a Leak and What to Do About It in Canada
 Can You Install a New Roof Over an Old One in Canada?
 The Top Questions to Ask Before Hiring a Roofer in Canada
 What Are the Most Common Roofing Scams and How to Avoid Them in Canada
 How to Prepare Your Home for a Roofing Project in Canada