
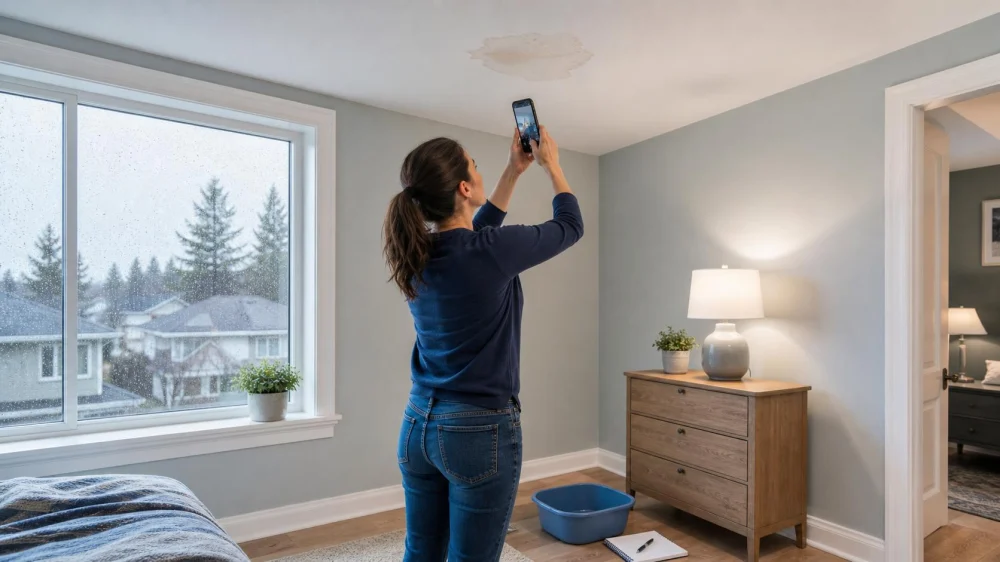
Roof Leak Photo Log: What to Record Before Repairs
On this page
Quick answer
Document a roof leak from safe indoor or ground-level positions. Take wide and close photos, note the date, weather, rooms affected, when dripping began, and how the stain changed. Record temporary containment without hiding damage. Send the organized timeline to a qualified roofing professional, but do not delay urgent help for active water, electrical hazards, sagging materials, or structural concerns.
This guide is for homeowners and property managers in Canada who need to communicate a leak clearly before an inspection. It helps organize observations; it does not identify the roof defect or replace an on-site assessment.

Atlas-Apex Roofing Inc. / atlas apex toronto
65 Disco Rd, Etobicoke, ON M9W 1M2, Canada
What a roof leak log does
A roof leak photo log is a dated record of visible moisture, weather conditions, affected spaces, and changes over time. Its purpose is to give a roofing professional a clearer starting point and help the owner remember what happened between rain, snow, thaw, wind, and dry periods.
The interior drip point is not always directly below the entry point. Water can move along roof decking, framing, insulation, pipes, or other surfaces before it becomes visible. Treat the log as evidence of symptoms, not proof of a cause. Avoid captions such as “failed flashing” unless a qualified person has actually confirmed that finding.
A useful log can also support conversations with a landlord, condominium manager, insurer, or restoration contractor. Each party may require its own forms, deadlines, or documentation, so contact the relevant organization promptly rather than assuming photos alone satisfy a policy or notice requirement.

Flynn Canada Ltd. - Toronto / flynn mississauga
MississaugaRegional Municipality of PeelOntario
6435 Northwest Dr, Mississauga, ON L4V 1X1, Canada
Make the area safe first
Photos are secondary to safety. Do not enter an area with a bulging or sagging ceiling, visible structural movement, falling material, strong odours, smoke, or water near electrical equipment. Keep people and pets away and contact the appropriate emergency or qualified service.
- Do not climb onto a wet, icy, snow-covered, steep, or damaged roof to document it.
- Do not place a ladder on an unstable surface or improvise access for a better camera angle.
- Do not touch wet electrical fixtures, wiring, outlets, appliances, or a panel.
- Do not puncture a swollen ceiling; stored water and damaged material can fall unpredictably.
- Do not disturb suspect mould, damaged insulation, or older materials that may contain hazardous substances.
If the situation is stable, move valuables away from the drip without standing beneath damaged finishes. Use a container only when it can be placed safely. Record what you moved and any temporary measure you took.
What to photograph and record
- Start with a room-wide view. Show where the stain or drip is located relative to walls, windows, ceilings, and fixtures. This gives context that a close-up cannot.
- Add a medium view. Frame the affected ceiling or wall and nearby features such as a chimney chase, skylight well, bathroom fan, exterior wall, or plumbing fixture. Record proximity without claiming a cause.
- Take a clear close-up. Capture the stain edge, bubbling paint, damp seam, or drip location. Keep the camera angle consistent for later comparison.
- Include scale safely. Place a ruler or common object beside a dry, reachable stain if doing so does not touch damaged material. Never stand under a weakened ceiling to add scale.
- Record the floor below. Photograph pooled water, damaged flooring, or the containment container, then note whether the surface was already damaged.
- Capture exterior context from the ground. A wide photo can show the roof slope, tree debris, displaced visible material, ice accumulation, or the side of the building affected. Use zoom rather than climbing.
- Record safe attic observations only if access is routine and conditions are safe. Photograph visible dampness from a stable walkway without stepping between framing members, moving insulation, touching wiring, or approaching a weak area.
Keep the original image files. Editing, heavy cropping, filters, or drawing over the only copy can remove useful context and metadata. If you add arrows or notes, save an annotated duplicate.
Build a useful timeline
Create one short entry whenever the condition changes. Use local date and time and keep observations factual.
- Weather: steady rain, wind-driven rain, snowfall, freezing rain, thaw, or a dry period. A general description is enough; do not invent measurements.
- Start and stop: when dripping or dampness was first noticed and whether it continued after the weather changed.
- Location: room, floor, wall or ceiling area, and nearby fixed feature.
- Change: stain expanded, drip rate changed, a second location appeared, or material began to bubble or sag.
- Containment: container placed, contents moved, area closed off, or emergency service contacted.
- Related history: previous leak in the same area, recent roof work, an ice event, or another known incident. Label uncertain memories as approximate.
A simple naming pattern keeps photos sortable: YYYY-MM-DD_time_room_view. For example, 2026-08-02_0915_upstairs-bedroom_wide identifies the observation without diagnosing it. If the phone records timestamps automatically, still include a short written timeline so the sequence is easy to scan.
Prepare the file for a roofer
Put the most decision-useful information first. A one-page summary can include the property area affected, first observation, current status, urgent hazards, recent relevant work, and access considerations. Attach a small set of representative photos, then keep the full originals available.
Ask the roofing company what it needs before the visit. Useful questions include:
- Should the owner send full-resolution images or a smaller selection?
- Does the contractor need attic access, and who should clear the route?
- Should an active leak be treated as emergency service?
- Will the inspection cover only the suspected area or the broader roof system?
- How will findings, temporary work, and recommended permanent repairs be documented?
For a rental or managed property, report the leak through the required channel and preserve the confirmation. For an insurance question, ask the insurer what steps and records are required before authorizing non-emergency work. Do not postpone action needed to protect people or prevent immediate major damage while assembling a perfect file.
Limits and urgent warning signs
Photos can miss moisture behind finishes, damaged decking, wet insulation, mould, compromised fasteners, and problems visible only under safe professional access. A dry stain does not prove the roof is currently sound, and a small stain does not measure the full extent of hidden water.
Seek prompt professional or emergency help when water cannot be contained, the ceiling sags or cracks, material falls, the structure shifts, water approaches electrical components, or a storm has created an opening in the building envelope. The correct contact may be a roofer, electrician, emergency service, building manager, insurer, or restoration professional depending on the hazard.
Roof access and repair rules differ across Canadian provinces, territories, and municipalities. Contractors should follow the requirements that apply in their jurisdiction. Property owners can ask about insurance, training, fall protection, inspection scope, and written documentation rather than attempting the same work themselves.
Frequently asked questions
How many photos should I send?
Send enough to show context and change without burying the key evidence: usually a wide view, a medium view, a close-up, and one or two dated follow-ups per affected location. Keep all originals available if the contractor asks for more.
Should I photograph the roof during rain?
Photograph interior symptoms and exterior context only from safe positions. Rain, wind, ice, darkness, and damaged materials increase access hazards. Do not climb onto the roof for documentation.
Can a photo locate the exact source of a leak?
Usually not by itself. Water can travel before appearing indoors, and several roof or building-envelope details can produce similar symptoms. Use photos to guide an inspection, not to confirm a repair diagnosis.
Should I clean the stain before the inspection?
Do not conceal or disturb the area before it is documented and assessed. If a cleanup step is necessary for safety or to limit damage, photograph the condition first when safe, record what was done, and retain invoices or service notes.
Is a phone screenshot enough for an insurance claim?
Requirements vary. Preserve original files, dates, communications, receipts, and the event timeline, then ask the insurer what formats and evidence it accepts. This article is not insurance or legal advice.
Sources and evidence notes
The safety boundaries here reflect general professional practice: avoid uncontrolled work at height, do not enter visibly unsafe areas, and use observations to support—not replace—an inspection. The Canadian Centre for Occupational Health and Safety describes residential roofing hazards, including falls, weather, ladders, weak structures, tools, and hazardous substances. Government of Canada housing guidance classifies serious, uncontainable roof leaks as an emergency condition in that housing context. Local requirements and the facts of an individual property still control.
Next steps
From a safe position, make one complete photo set and a factual timeline entry today. Contact a qualified local roofing professional, explain whether water is active, and share the summary before the visit. Continue logging material changes, and escalate immediately if the condition becomes unsafe or cannot be contained.

 PCC Roofing - Kelowna5.0 (3 reviews)
 Metal Roof Canada | Steel Roofing Markham5.0 (41 reviews)
 Roofing Vancouver BC3.0 (3 reviews)
 First Choice Roofing4.0 (32 reviews)
 Ideal Roofing5.0 (2 reviews)
 Chateau Roofing & Siding Ltd.4.0 (10 reviews)
 How Much Does a New Roof Cost in 2025? Canadian Roofing Price Guide
 Top Signs Your Roof Has a Leak and What to Do About It in Canada
 Can You Install a New Roof Over an Old One in Canada?
 The Top Questions to Ask Before Hiring a Roofer in Canada
 What Are the Most Common Roofing Scams and How to Avoid Them in Canada
 How to Prepare Your Home for a Roofing Project in Canada