
Roofing Nail Cleanup: Protect Yards, Driveways, and Tires
On this page
- Plan cleanup before work starts
- Map high-risk areas
- Move people, pets, and vehicles
- Ask about containment
- Understand magnetic sweeping
- Inspect from the ground
- Check grass, gardens, and hard surfaces
- Protect neighbours and shared areas
- Respond to a found nail or puncture
- Document final cleanup
- Roofing cleanup checklist
Roof replacement and repair can release old nails, metal fragments, shingle pieces, staples, and packaging around a property. Professional crews use tarps, controlled removal, waste containers, and magnetic sweepers, but no single method can guarantee that every sharp object is captured. Planning the cleanup zone before work begins reduces exposure and makes the final inspection more effective.
Homeowners should stay on the ground, keep people and pets away from active work, and coordinate concerns with the roofing contractor. The goal is a documented cleanup process—not climbing, reaching into debris, or walking through an unsafe area to find problems yourself.

Lam Metal / lam metals
BurnabyMetro VancouverBritish Columbia
6962 Buller Ave, Burnaby, BC V5J 4V4, Canada
Plan cleanup before work starts
Ask the contractor to describe debris containment and daily and final cleanup in the written scope. Confirm who supplies the waste bin, how materials move from roof to ground, where removed shingles are staged, how often the site is swept, and what happens after the final load leaves.
Discuss landscaping, decks, pools, air-conditioning equipment, play areas, paths, and shared property lines. Take ground-level photos before the crew arrives. Identify fragile plants and surfaces, but let the contractor decide which protective setup is compatible with safe roofing work.

Custom Contracting Burlington Roofing & Eavestrough Repair Burlington / eavestrough burlington
BurlingtonRegional Municipality of HaltonOntario
687 Waterloo St, Burlington, ON L7R 2S9, Canada
Map high-risk areas
Falling debris can land beyond the edge of the roof, especially during windy conditions or removal from a steep section. Downspouts, shrubs, mulch, gravel, deck gaps, window wells, and long grass can hide nails. Driveways and the curb route deserve attention because a vehicle can carry a fastener into a tire.
Walk the property with the contractor before work starts, staying on the ground. Note gates, neighboring access, overhead lines, narrow passages, basement entrances, and areas children or pets normally use. Agree which zones will be closed and how barriers or signs will be maintained.
Move people, pets, and vehicles
Park vehicles beyond the contractor's stated debris and delivery zones before materials arrive. Consider where workers, suppliers, waste trucks, and emergency vehicles need access. Do not move a car back simply because the crew has stopped for the day; wait until the contractor has completed the daily ground cleanup and released the route.
Keep children and pets indoors or away from the property during active work and cleanup. Sharp fragments can remain hidden even after visible debris is removed. Plan toilet breaks and walks through a safe entrance that the site supervisor has confirmed.
Ask about containment
Contractors may use tarps, chutes, catch systems, plywood, or designated drop zones based on the building and site. Protection should contain debris without blocking required exits, damaging heat-sensitive plants, or creating a slip or trip hazard. It also must not interfere with ladder, scaffold, or fall-protection systems.
Do not reposition tarps or reach beneath them while work is underway. A tarp can conceal sharp material and may be holding debris that shifts when lifted. Report a gap, damaged protection, or loose material to the site contact and allow the crew to correct it.
Understand magnetic sweeping
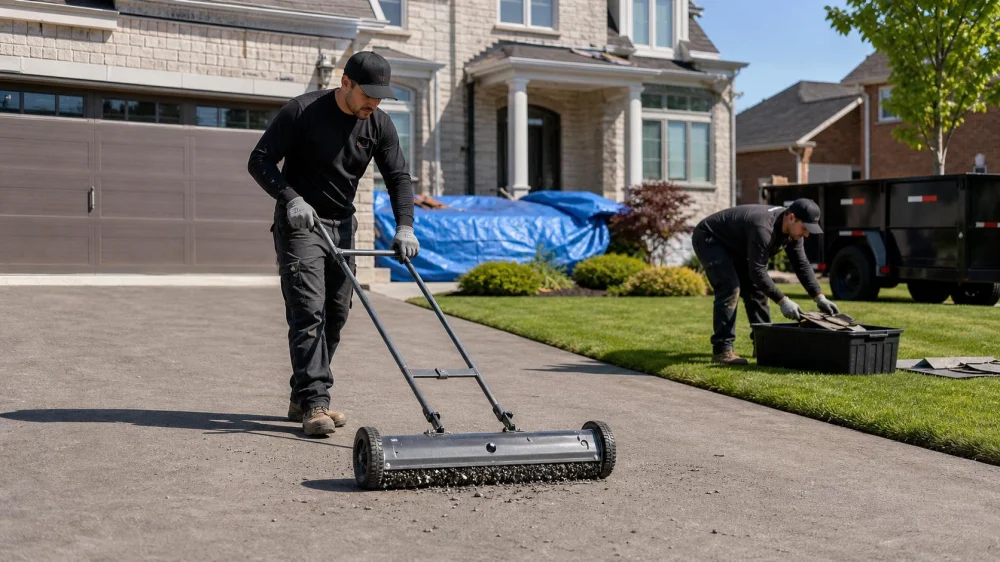
A rolling or handheld magnetic sweeper can collect many ferrous nails and metal pieces from accessible surfaces. Ask which areas will be swept and whether the crew repeats the process after the bin and equipment move. Multiple passes in different directions can improve coverage.
Magnets do not collect every type of metal, and they may be less effective in deep grass, dense mulch, gravel, soil, snow, or clutter. Staples, aluminum pieces, broken blades, and nonmetal debris require visual and manual methods by trained workers. A magnetic sweep is part of cleanup, not proof that the property contains no hazards.
Inspect from the ground
After the contractor declares the area ready, perform a daylight ground-level walk with the site supervisor. Wear sturdy closed footwear and avoid reaching into vegetation with bare hands. Do not climb onto the roof, ladder, waste bin, scaffold, or stacked materials.
Look along travel paths, driveway edges, around downspouts, beneath roof overhangs, beside the bin location, and near gates. Point out suspected debris and let the crew collect it with suitable tools. If lighting or weather prevents a good review, schedule another check instead of rushing.
Check grass, gardens, and hard surfaces
Short grass is easier to inspect than tall growth, so discuss mowing timing before the project. Do not mow active debris into smaller, harder-to-find pieces. Flower beds and mulch may require careful visual work and an appropriate magnet or rake handled by the crew.
On decks, patios, steps, and pavement, check seams, drains, mats, expansion joints, and the edges of protective plywood. Ask that gutters and downspouts be cleared as included in the contract, since fasteners and shingle granules can move through drainage routes.
Protect neighbours and shared areas
Tell adjacent neighbours the work dates and who to contact about debris, while respecting the contractor's access plan. For semi-detached homes, townhomes, shared driveways, or narrow lots, identify the property boundary and obtain required permission before a crew enters another yard.
Include sidewalks, laneways, curb areas, and shared parking in the cleanup conversation. Do not enter a neighbour's property to retrieve debris without consent. If wind carries material beyond the planned zone, notify the contractor promptly so it can expand the inspection safely.
Respond to a found nail or puncture
If you find a nail, keep others away and photograph its location before safe collection. Wear suitable gloves and use a tool or rigid container rather than a pocket or thin bag. Report it to the contractor, especially if found after the final sweep, so nearby areas can be checked again.
For a nail in a tire, do not pull it out immediately; removal can release air faster. Avoid driving on a visibly low or damaged tire and contact a qualified tire service. Keep photos, the repair invoice, and the roofing project information, then follow the contract's process for reporting property damage.
Document final cleanup
Record the date of daily and final sweeps, the areas reviewed, outstanding concerns, and when the waste container left. Take ground-level completion photos. Ask the contractor to confirm cleanup and disposal obligations in the final paperwork rather than relying only on a verbal statement.
Continue using footwear outdoors for a reasonable period and check high-traffic areas after rain, mowing, or snowmelt reveals hidden material. If debris continues to appear, document the locations and request a return visit under the written scope.
Roofing cleanup checklist
- Put containment, daily cleanup, and final cleanup in the scope.
- Photograph landscaping and hard surfaces before work.
- Move vehicles beyond delivery, bin, and debris zones.
- Keep children and pets out until routes are released.
- Never lift crew tarps or search active work areas.
- Ask where and how often magnetic sweeps will occur.
- Review grass, beds, pavement, drains, and shared access.
- Inspect only from the ground with sturdy footwear.
- Document found debris and request another sweep.
- Keep cleanup records with the final roofing documents.
Roofing nail cleanup is most reliable when containment, repeated sweeping, visual checks, and documentation work together. Define the process before removal begins, protect people and vehicles, and walk the released site with the contractor. A careful ground-level review helps the property return to normal without asking the homeowner to enter the very hazards the cleanup is meant to remove.



 Top Tier Roofing4.0 (9 reviews)
 Roofers Scarborough3.0 (14 reviews)
 ABC roof service5.0 (34 reviews)
 Evandale Roofing & Siding4.0 (23 reviews)
 T. Simpson Roofing4.0 (41 reviews)
 Best Busy Boys Roofing Ltd.3.0 (9 reviews)
 How Much Does a New Roof Cost in 2025? Canadian Roofing Price Guide
 Top Signs Your Roof Has a Leak and What to Do About It in Canada
 Can You Install a New Roof Over an Old One in Canada?
 The Top Questions to Ask Before Hiring a Roofer in Canada
 What Are the Most Common Roofing Scams and How to Avoid Them in Canada
 How to Prepare Your Home for a Roofing Project in Canada